Source:- Google.com.pk
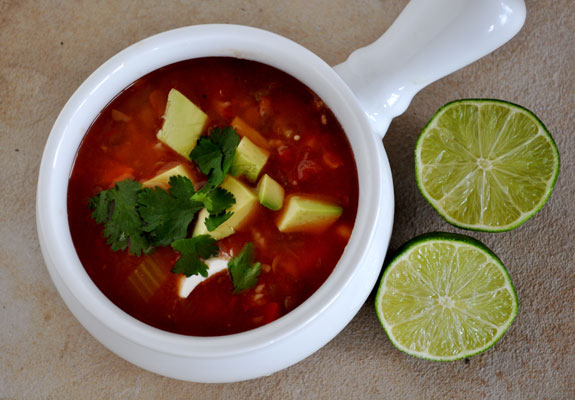
Butternut Squash Chipotle Chili with Avocado:-
Fall is in the air, as they say. The green leaves are just beginning to acknowledge the change in seasons along their peripheries; my nose is following suit with incessant sneezes. It’s that wonderfully awkward transitional time when I’m never sure what to wear: shorts now, or a sweater for later? And what do I cook: the last of the tomatoes, or sweet potatoes? We’ll be bundled up in scarves, carving pumpkins and crafting Halloween costumes before we know it. I can’t wait.
Football season seems to be in full swing, too. My old friends are taunting me with photos of game day meals made in the college town I used to call home—let’s be honest, football is really all about the food and beer anyway. Forget standing in crowds at stadiums! Give me a comfortable seat, friends, good food and drinks. The fact that a game is on while I chit-chat is purely secondary.
This butternut squash and black bean chili is just right for fall weather and football games. It strikes that balance between spicy and sweet that I love in Mexican food, like a good mole sauce. Chipotle and chili powder provide ample spice to round off the sweet, seasonal flavor of butternut squash. Top with crispy tortilla strips and plenty of creamy, diced Avocados from Mexico for a hearty meal that will satisfy vegans, carnivores and gluten-free eaters alike. Meals like that aren’t easy to come by, you know?
The chili happens to be super simple to make, too. Once you have your vegetables chopped, your work is almost done. Speaking of which, I’ve done my fair share of cursing at butternut for being difficult to peel and slice, but I didn’t have any trouble when I followed Simply Recipes’ method. I don’t know if it was her method or this butternut squash in particular, but it was a breeze. Try it!
Hearty, spicy and sweet vegetarian chili made with butternut squash and black beans. Top with creamy avocado for an easy meal that satisfies vegans, carnivores and gluten-free eaters alike.
Ingredients
1 medium red onion, chopped
2 red bell peppers, chopped
1 small butternut squash (1½ pounds or less), peeled and chopped
4 garlic cloves, pressed or minced
2 tablespoons olive oil
ground sea salt
1 tablespoon chili powder
1 teaspoon ground cumin
½+ tablespoon chopped chipotle pepper in adobo* (start with ½ tablespoon and add more to taste, I thought mine was just right with 1 tablespoon)
1 bay leaf
¼ teaspoon ground cinnamon
14-ounce can diced tomatoes, including the liquid**
4 cups cooked black beans or 2 cans, rinsed and drained
14-ounce can (about 2 cups) vegetable broth
2 Avocados from Mexico, diced
3 corn tortillas for crispy tortilla strips*** (or substitute crumbled tortilla chips)
cilantro (optional, for garnish)
Instructions
In a 4 to 6 quart Dutch oven or stockpot, sautée the chopped vegetables (onion, bell pepper, butternut squash, garlic) in one to two tablespoons of olive oil on medium-high heat. You’ll need to stir the ingredients every few minutes so they can cook evenly.
Once the onions start turning translucent, turn the heat down to medium-low. Add all of the spices and canned ingredients, and stir. Cover for about one hour, stirring occasionally. Taste test for spice level and add more chipotle if desired.
By the time your chili is done, the butternut squash should be nice and tender and the liquid should have reduced a bit, producing the hearty chili consistency that we all know and love.
Make the crispy tortilla strips: stack the corn tortillas and slice them into thin little strips, about 2 inches long. Heat a small pan over medium heat, add a drizzle of olive oil and toss in the tortilla slices. Sprinkle with salt and stir. Cook until the strips are crispy and turning golden, stirring occasionally, about 4 to 7 minutes. Remove tortilla strips from skillet and drain on a plate covered with a piece of paper towel.
Serve the chili in individual bowls, topped with crispy tortilla strips and plenty of diced avocado. I added a little sprinkle of red pepper flakes (optional). Cilantro would be nice as well. You might want to serve this along with some chipotle hot sauce (Tobasco makes one) for the spice addicts like myself.
Notes
Serves 3 to 4. This chili is very hearty, but feel free to add another can of tomatoes or more vegetable broth if you want to thin it out a bit. Double the recipe for a crowd.
*Chipotle in adobo sauce is usually found in the Mexican section of the grocery store. I never need a whole can at once, so I use what I need and then transfer the rest to a small freezer bag, pressing it flat so that I can pull off as much as I need later.
**Find BPA-free cans of diced tomatoes if possible. Muir Glen's canned tomatoes are BPA-free.
***Look for corn tortillas that contain minimally processed ingredients. There should only be about 5 ingredients listed, and wheat shouldn't be one of them.
On leftovers: This chili reheats great. Avocado and crispy tortilla chips should be added after reheating, just before serving. These tortilla strips tend to lose their crisp over time, so you can a) skip them altogether, b) make more just before serving or c) substitute a small handful of crumbled tortilla chips instead!
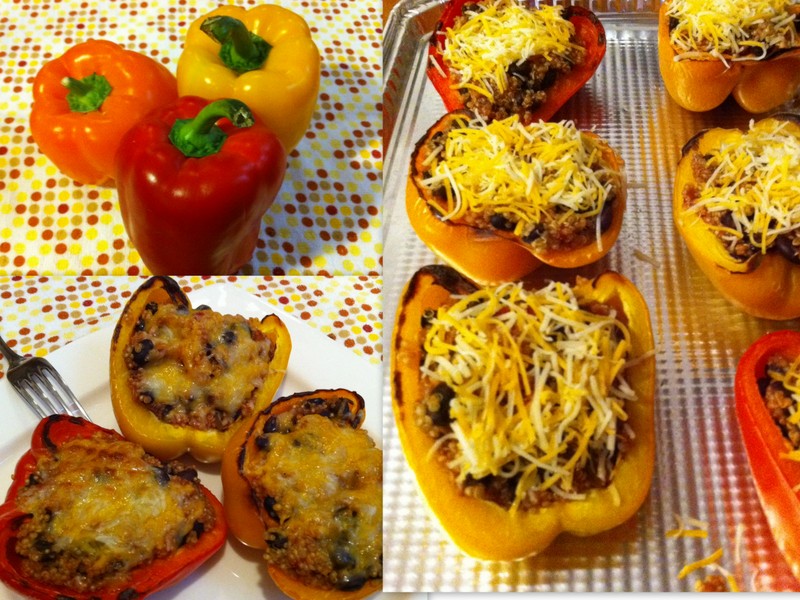
Beer Bean-Stuffed Poblano Peppers:-
These stuffed peppers are my kind of Mexican food: fresh and full of flavor, filling but not too heavy. They’re the first complete recipe I’ve cooked from Sara and Hugh Forte’s beautiful new cookbook, The Sprouted Kitchen, and I can easily see why they are one of Sara’s favorites to cook for company.
I feel pretty safe in assuming that most of you, as readers of this little whole foods blog, are familiar with Sprouted Kitchen. Sara’s recipes, which are photographed by her husband Hugh, are always vibrant, inspiring and feature fresh, seasonal produce at its finest.
Sara and her publisher, Ten Speed Press, kindly sent me an advance copy, which at first flip through sent my mind into a tizzy with its gorgeous photos and ingenious recipes. The cover of my copy already has a few splatters on it and I expect there will be many more to come. This one is a keeper, friends. I think you are going to want a copy of your own.
One of my favorite features of the book are Sara’s meal planning suggestions, like which recipes to cook for a brunch with friends or a slow morning at home, make-ahead snacks for house guests and happy hour with the girls.
These peppers are on the menu for a casual dinner for guests, which Sara suggests serving along with her white sangria, papaya and red quinoa salad with Mexican caesar dressing and coconut lime tart. Despite their impressive names, I assure you that these recipes do not call for impossible ingredients or intimidating instructions. They are as brilliantly simple as they are fresh and flavorful. Now then, who wants to come over for dinner?!
The most time-consuming and variable step here is cooking the beans. Canned beans would be a big time saver; see the notes section for Sara’s recommendations on how to sub them for home-cooked beans.
Ingredients
Beer beans
½ pound dried black beans, picked over and rinsed (or 2 cans of cooked beans*; you’ll need about 4 cups, cooked)
1 teaspoon olive oil
1 yellow onion, chopped
2 cloves garlic, minced
12 ounces Mexican beer (I used Tecate, Sara recommends a darker beer like Negra Modelo)
1 canned chipotle chile in adobo, chopped (1 pepper, not the whole can!), or ½ teaspoon chipotle chile powder
scant ½ teaspoon ground cinnamon
sea salt
Peppers
6 poblano chiles
1 cup crumbled cotija or feta cheese (I couldn’t find cotija, so I used feta)
1 cup shredded Jack cheese
juice of ½ lime
1 cup cherry tomatoes, chopped
1 tablespoon olive oil
½ cup chopped fresh cilantro
Instructions
In a large bowl, soak the beans in plenty of water for at least 6 hours, or up to overnight.
Drain the beans and set them aside. In a large pot over medium heat, add the olive oil, onion and garlic and sauté for a few minutes, until the onion is just softened.
Add the soaked beans and 2½ cups water, stir, and bring the beans to a simmer. Simmer until the beans are cooked through (but not totally tender), 45 minutes to 75 minutes. Add the beer, chipotle and cinnamon and simmer until much of the liquid is absorbed, around 20 minutes. If necessary, add some water to keep the beans from drying out. Add ½ to ¾ teaspoon salt, to taste, and cook for another 10 minutes. Preheat the oven to 425 degrees and set the beans aside.
Grease a large baking dish or cast iron skillet(s)**. Cut a slit down the length of each poblano. Use your fingers (you might want to wear gloves) and a paring knife to remove, and then discard, the membranes and seeds from each pepper.
In a bowl, mix together the shredded Jack and crumbled cotija/feta cheese with the lime juice. If there is still a good amount of liquid in your beans, drain off some of it. Mix the chopped tomatoes into the beans. Use a spoon to fill most of each pepper with beans, then stuff a handful of cheese inside. Brush the outside of each pepper with olive oil and bake for around 25 minutes, until the tops are roasted and golden and the pepper is tender all around. Serve peppers immediately, with the slit side up and garnished with cilantro.
Notes
Adapted from The Sprouted Kitchen Cookbook by Sara Forte.
Sara recommends serving the peppers with Spanish rice. I took the lazy route and cooked up 2 cups (dried) long grain brown rice and mixed in ½ cup store-bought, mild salsa verde.
You can also cook these peppers on the grill. Sara says to preheat the grill to medium-high heat, leaving one section over indirect heat. Grill the peppers over direct heat, rotating them every few minutes in order to evenly char the outsides, 6 to 8 minutes total. Transfer them to indirect heat for another 8 to 10 minutes, until the insides are melty and the peppers have softened up.
*To substitute canned beans here, rinse and drain the beans and then sauté the onion and garlic in olive oil as directed in step 2. Don't add water, just the beer, chipotle and cinnamon, and simmer, uncovered, for about 10 to 15 minutes. You probably don't need to add salt since canned beans contain so much sodium, so you can proceed with stuffing the peppers once the beer and bean mixture has reduced. Note that Sara's original recipe calls for pinto beans or Rio Zape beans.
**I didn't think of it until later, but perhaps baking the peppers in a cast iron pan would have helped cook the bottom sides of the larger peppers (you could even preheat the pan in the oven to further the process). I also think corn cut fresh from the cob would make a nice addition to the beer bean stuffing.
This recipe can be gluten-free if and only if you use gluten-free beer.
Blue Corn Nachos with Homemade Guacamole:-
Nachos, my low-brow delicacy of choice, bring back fond memories of my former jobs in food service. In high school, my first “real job” was working in a concessions stand at a little league baseball park with my best friends. After school and on weekends, we giggled and bumped hips as we poured glugs of processed cheese into plastic compartments.
We handed out countless nachos, microwaved hot dogs and Gatorades to hoards of hungry boys, taking breaks behind the corner to gleefully dip our own round and salty chips into that artificially orange cheese. We knew it was bad, but back then, our waistlines never expanded and we were far more focused on the cute field maintenance guys than on our consumption of trans fats. Those were the days.
Then in college (well, just after college), I got a job at my favorite bar. It was cozy on the inside, with just ten tables, and had a nice patio with lush landscaping that shielded the drinkers from views of campus. It was a little oasis with cheap well drinks, happy hour specials and the best nachos in town.
These nachos were a major step up from the concession stand nachos, considering that they were made with real cheese and vegetables, and then cooked to bubbling, golden perfection in a conveyor oven. We would often order ourselves nachos during our shifts, sneaking into the back room for a few moments of cheesy relief while those drunk, demanding college students waited for their next round of beers.
I learned a couple of things about nacho making during my tipsy after-hour experiments in that bar’s kitchen, namely that you can do no wrong as long as you use enough cheese. Now is not the time to skimp! While I love to dunk plain tortilla chips into dips, a naked tortilla chip plucked from a plate of nachos is a disappointing chip indeed. You can use more than one cheese for a more complex flavor, and be sure to cook the nachos long enough that the cheese gets bubbly and golden.
Pick a theme for the veggies, too. Go for standard Mexican nachos with fresh chopped tomatoes, jalapeños and onions, or put an Italian spin on them with mushrooms, olives and bell peppers (try adding some freshly minced garlic, too). Serve your nachos with mandatory sides of homemade guacamole made with creamy avocados from Mexico and salsa, and maybe some sour cream.
My version of nachos here doesn’t exactly qualify as a gourmet meal or a healthy one, but it could certainly be worse. Make these for a special occasion, like the Super Bowl, or when no amount of kale salad will satisfy your cravings for cheesy, salty goodness. If anyone asks why you’re eating nachos, you can blame me.
Irresistible nachos made with blue corn chips, cheddar and feta cheese, and a colorful assortment of vegetables (roasted red peppers, jalapeños and red onion). Amounts given below are approximate; you can eyeball everything here.
Ingredients
Nachos
Blue corn chips (I like Target’s Archer Farms organic chips)
1½ cups shredded raw cheddar or Jack cheese
⅓ cup crumbled feta cheese
¼ cup chopped red onion
⅓ cup chopped roasted red pepper
1 jalapeño, seeded and membranes removed, finely chopped
Guacamole
2 ripe avocados from Mexico
1 tablespoon fresh lime juice
1 to 2 cloves garlic, minced or crushed through a garlic press
½ teaspoon salt (add more to taste)
2 tablespoons chopped fresh cilantro
¼ teaspoon ground coriander
½ to 1 jalapeño, seeded and finely chopped (optional)
3 medium radishes, top and bottom ends removed and finely sliced (or chopped onion, see note)
Instructions
Preheat oven to 350 degrees Fahrenheit. Line a baking sheet with parchment paper. Place handfuls of chips on the baking sheet and distribute evenly, minimizing the gaps between chips.
Sprinkle generously and evenly with shredded cheese. Sprinkle veggies over the cheese, then sprinkle on the feta. Repeat to build layers if you’re feeding a crowd. Bake until the cheese is melted and bubbling, about 15 minutes for a single layer or 20 minutes for multiple layers. Serve immediately on a heat-safe surface (transfer the parchment paper to a serving platter or at minimum, warn eaters of the hot baking surface).
While the nachos are baking, make the guacamole. Slice the avocados in half length-wise, running your knife around the pit. Twist the halves in opposite directions, then pull apart the halves. Dislodge the pits and use a large spoon to scoop the flesh into a medium bowl. Sprinkle with lime juice, then mash the avocado with a large fork or potato masher. Stir in the garlic, salt, cilantro, coriander, jalapeño (if using) and chopped radishes. Serve immediately.
Notes
Guacamole recipe adapted from Rick Bayless via Food and Wine.
If you’re making nachos for a crowd: pile up the chips, cheese and toppings in layers on the baking sheet. The quantities given for the guacamole yield a modest amount, enough for two to four people. Multiply the quantities as necessary.
If you want your nachos to stay warm for a while after baking, you might have better luck baking them in a large stoneware baking dish, oven-safe serving plate or cast iron pan. Cookie sheets don't retain heat for long.
I used radishes for some pungent heat in this guacamole, but you could substitute finely chopped white onion if you prefer. Rick Bayless recommends finely chopping ¼ of a small white onion, then rinsing the chopped onion under water to mellow the flavor. Shake the onions well to get rid of excess water before mixing it into the avocado.
To store the guacamole for later: press plastic wrap over the surface to help prevent oxidation. Guacamole is best eaten sooner rather than later.
Mexican Vegetable Recipes Vegetable Recipes 2015 in Urdu Filipino for Kids Indian Chinese Panlasang Pinoy Images Photos Pics
Mexican Vegetable Recipes Vegetable Recipes 2015 in Urdu Filipino for Kids Indian Chinese Panlasang Pinoy Images Photos Pics

Mexican Vegetable Recipes Vegetable Recipes 2015 in Urdu Filipino for Kids Indian Chinese Panlasang Pinoy Images Photos Pics

Mexican Vegetable Recipes Vegetable Recipes 2015 in Urdu Filipino for Kids Indian Chinese Panlasang Pinoy Images Photos Pics

Mexican Vegetable Recipes Vegetable Recipes 2015 in Urdu Filipino for Kids Indian Chinese Panlasang Pinoy Images Photos Pics

Mexican Vegetable Recipes Vegetable Recipes 2015 in Urdu Filipino for Kids Indian Chinese Panlasang Pinoy Images Photos Pics
Mexican Vegetable Recipes Vegetable Recipes 2015 in Urdu Filipino for Kids Indian Chinese Panlasang Pinoy Images Photos Pics

Mexican Vegetable Recipes Vegetable Recipes 2015 in Urdu Filipino for Kids Indian Chinese Panlasang Pinoy Images Photos Pics
Mexican Vegetable Recipes Vegetable Recipes 2015 in Urdu Filipino for Kids Indian Chinese Panlasang Pinoy Images Photos Pics

Mexican Vegetable Recipes Vegetable Recipes 2015 in Urdu Filipino for Kids Indian Chinese Panlasang Pinoy Images Photos Pics
Mexican Vegetable Recipes Vegetable Recipes 2015 in Urdu Filipino for Kids Indian Chinese Panlasang Pinoy Images Photos Pics
No comments:
Post a Comment